From Vision to Reality: Setting Up Simple Weather
In Part 1, we explored the vision and planning behind Simple Weather. Now it’s time to turn that vision into reality by setting up the project structure. This is where the rubber meets the road – we’ll create the foundation that will support our Simple Weather app throughout its development journey.
Project Setup Strategy
Before diving into Xcode, I spent time planning the Simple Weather project structure. A well-organized project from the start saves countless hours later and makes it easier for other developers (or future you) to understand and maintain the codebase.
Why Project Structure Matters for Simple Weather
The Simple Weather project structure isn’t just about organizing files – it’s about:
- Scalability: Easy to add new features without breaking existing code
- Maintainability: Clear separation of concerns and logical grouping
- Team Collaboration: Other developers can quickly understand the codebase
- Testing: Organized structure makes writing and running tests easier
- Performance: Proper organization can lead to better build times and app performance
Creating the Simple Weather Xcode Project
Step 1: Project Initialization
I started by creating a new Xcode project with these specifications:
Project Name: SimpleWeather
Bundle Identifier: com.yourcompany.simpleweather
Language: Swift
Interface: SwiftUI
Life Cycle: SwiftUI App
Key Decision: I chose SwiftUI App lifecycle over UIKit App Delegate because it’s the modern approach and aligns perfectly with our Simple Weather app’s declarative UI philosophy.
Step 2: Target Configuration
For Simple Weather, I set up multiple targets from the beginning:
Targets:
├── SimpleWeather (Main App)
├── SimpleWeatherTests (Unit Tests)
└── SimpleWeatherUITests (UI Tests)
This multi-target approach ensures that testing is built into our Simple Weather development process from day one.
Directory Structure Design
The Simple Weather Folder Hierarchy
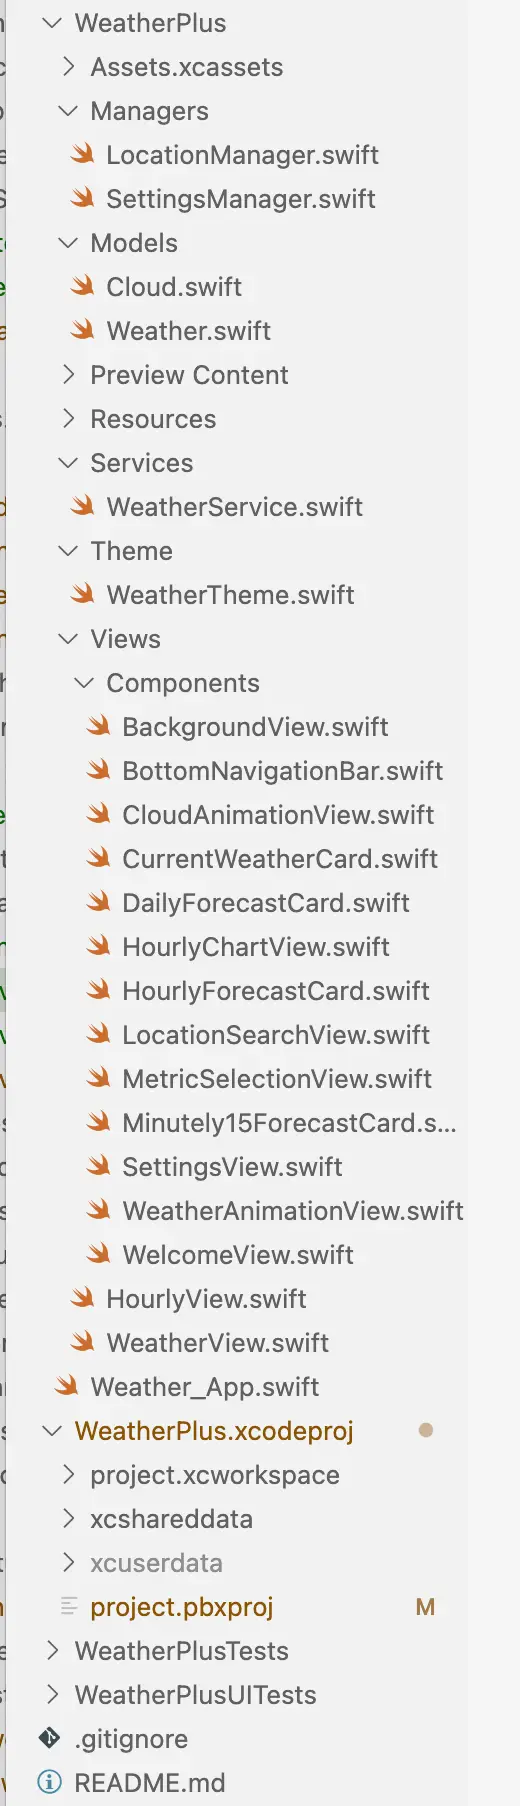
I organized the Simple Weather project with a clear, scalable structure:
SimpleWeather/
├── SimpleWeather/
│   ├── SimpleWeatherApp.swift          # App entry point
│   ├── Assets.xcassets/                # App icons and images
│   ├── Views/                          # SwiftUI views
│   │   ├── Main/                       # Main app views
│   │   └── Components/                 # Reusable UI components
│   ├── Models/                         # Data models
│   ├── Services/                       # External service integrations
│   ├── Managers/                       # System-level managers
│   ├── Theme/                          # UI theming and styling
│   ├── Resources/                      # Static resources
│   └── Preview Content/                # SwiftUI preview assets
├── SimpleWeatherTests/                 # Unit tests
└── SimpleWeatherUITests/               # UI tests
Why This Structure for Simple Weather?
Views Directory
Views/
├── Main/
│   ├── WeatherView.swift              # Main weather view
│   ├── HourlyView.swift              # Hourly forecast view
│   └── SettingsView.swift            # Settings view
└── Components/
    ├── CurrentWeatherCard.swift      # Current weather card
    ├── DailyForecastCard.swift       # Daily forecast card
    ├── HourlyForecastCard.swift      # Hourly forecast card
    ├── BackgroundView.swift          # Weather background
└── WeatherAnimationView.swift # Weather animationsRationale: Separating main views from components allows for better reusability and testing. Each Simple Weather component can be developed and tested independently.
Services Directory
Services/
├── WeatherService.swift              # Weather API service
├── LocationService.swift             # Location services
└── NetworkService.swift # Network layerRationale: Services handle external integrations and API communications. This separation makes it easy to swap out weather data providers or add new services.
Managers Directory
Managers/
├── LocationManager.swift             # Location permissions and updates
├── SettingsManager.swift             # User preferences
└── CacheManager.swift # Data cachingRationale: Managers handle system-level integrations and app-wide state. They bridge the gap between iOS system services and our Simple Weather app.
Assets Organization for Simple Weather
Asset Catalog Structure
I organized the Simple Weather assets with a clear naming convention:
Assets.xcassets/
├── AppIcon.appiconset/               # App icon in various sizes
├── AccentColor.colorset/             # App accent color
├── Weather Icons/
│   ├── sun.imageset/                 # Sun weather icon
│   ├── cloud.imageset/               # Cloud weather icon
│   ├── rain.imageset/                # Rain weather icon
│   └── snow.imageset/                # Snow weather icon
├── Animation Frames/
│   ├── cloud0.imageset/              # Cloud animation frame 0
│   ├── cloud1.imageset/              # Cloud animation frame 1
│   └── ...                           # Additional frames
└── UI Elements/
    ├── card-background.imageset/     # Card background
    └── gradient-overlay.imageset/    # Gradient overlays
Asset Naming Conventions
For Simple Weather, I established these naming conventions:
- Weather Icons:
[weather-condition].imageset - Animation Frames:
[animation-name][frame-number].imageset - UI Elements:
[element-type]-[description].imageset - Colors:
[color-name].colorset
Initial Configuration Files
Info.plist Configuration
I configured the Simple Weather Info.plist with essential permissions and settings:
					<!-- Location Services -->
<key>NSLocationWhenInUseUsageDescription</key>
<string>Simple Weather needs your location to provide accurate weather information.</string>

<!-- Network Security -->
<key>NSAppTransportSecurity</key>
<dict>
    <key>NSAllowsArbitraryLoads</key>
    <false/>
</dict>

<!-- Supported Orientations -->
<key>UISupportedInterfaceOrientations</key>
<array>
    <string>UIInterfaceOrientationPortrait</string>
</array>
Project Settings Optimization
For Simple Weather, I optimized several project settings:
Build Settings
- Swift Language Version: Swift 5.9
- iOS Deployment Target: iOS 16.0
- Enable Bitcode: No (for better performance)
- Optimization Level: Fastest, Smallest [-Os]
Signing & Capabilities
- Team: Your development team
- Bundle Identifier: com.yourcompany.simpleweather
- Capabilities: Location Services, Background Modes (if needed)
App Entry Point Setup
SimpleWeatherApp.swift
I created a clean, minimal app entry point:
					import SwiftUI

@main
struct SimpleWeatherApp: App {
    var body: some Scene {
        WindowGroup {
            ContentView()
                .environmentObject(WeatherViewModel())
                .environmentObject(LocationManager())
        }
    }
}
Key Decisions:
- Environment Objects: Injecting dependencies at the app level ensures they’re available throughout the Simple Weather app
- Minimal Setup: Keeping the app entry point simple makes it easier to understand and maintain
Test Structure Setup
Unit Tests Organization
I organized the Simple Weather unit tests to mirror the main app structure:
SimpleWeatherTests/
├── Models/
│   └── WeatherModelTests.swift       # Weather model tests
├── Services/
│   ├── WeatherServiceTests.swift     # Weather service tests
│   └── LocationServiceTests.swift    # Location service tests
├── Managers/
│   └── SettingsManagerTests.swift    # Settings manager tests
└── ViewModels/
    └── WeatherViewModelTests.swift   # Weather view model tests
UI Tests Structure
For Simple Weather UI tests:
SimpleWeatherUITests/
├── SimpleWeatherUITests.swift        # Main UI test suite
└── SimpleWeatherUITestsLaunchTests.swift  # Launch tests
Version Control Setup
Git Configuration
I set up Git with a proper .gitignore file for Simple Weather:
# Xcode
.DS_Store
xcuserdata/
*.xcworkspace/xcuserdata/
*.xcodeproj/xcuserdata/
*.xcworkspace/xcshareddata/
*.xcodeproj/xcshareddata/

# Build
build/
DerivedData/

# Dependencies
Pods/
*.xcworkspace

# Environment
.env
*.plist

# IDE
.vscode/
.idea/
Branch Strategy
For Simple Weather development, I established this branching strategy:
main                    # Production-ready code
├── develop            # Integration branch
├── feature/weather-view    # Feature branches
├── feature/location-services
└── hotfix/            # Critical bug fixes
Development Environment Setup
Xcode Configuration
I configured Xcode for optimal Simple Weather development:
Editor Settings
- Font: SF Mono (for better code readability)
- Font Size: 14pt
- Theme: Dark mode (easier on the eyes)
- Line Numbers: Enabled
- Code Folding: Enabled
Build Settings
- Parallel Build: Enabled
- Build Active Architecture Only: Yes (for faster builds during development)
Code Style Guidelines
I established coding standards for Simple Weather:
					// MARK: - Properties
private let weatherService: WeatherService
private let locationManager: LocationManager

// MARK: - Initialization
init(weatherService: WeatherService, locationManager: LocationManager) {
    self.weatherService = weatherService
    self.locationManager = locationManager
}

// MARK: - Public Methods
func fetchWeather() async throws -> Weather {
    // Implementation
}
Next Steps in Simple Weather Development
With the project structure in place, we’re ready to move forward with:
- Part 3: Core Architecture & MVVM Implementation
- Part 4: Building the Weather Data Models
- Part 5: Implementing the Weather API Service
Key Takeaways from Simple Weather Project Setup
- Plan Before You Code: A well-thought-out project structure saves time and reduces technical debt
- Separate Concerns: Clear separation between views, models, services, and managers
- Test from Day One: Set up testing infrastructure early
- Follow Conventions: Consistent naming and organization make the codebase maintainable
- Document Decisions: Keep track of why you made certain architectural choices
Tools and Resources
Essential Xcode Extensions for Simple Weather
- SwiftLint: Code style enforcement
- InjectionIII: Hot reloading for SwiftUI
- GitLens: Enhanced Git integration
- Rainbow: Syntax highlighting
Useful Development Tools
- Postman: API testing for weather services
- Simulator: iOS device simulation
- Instruments: Performance profiling
- Console: Debug logging
Get Involved in Simple Weather Development
The project structure is now ready for development! In the next part, we’ll dive into implementing the MVVM architecture and setting up the core data flow for Simple Weather.
Have questions about the project setup or suggestions for improvements? Share your thoughts in the comments below!
Weather – Simple Weather iOS App: https://apps.apple.com/us/app/weather-simple-weather/id6747141875
Weather – Simple Weather support page and privacy page, please visit here: https://tools.regalrealm.com/ios-support/
Weather App Home Page: https://quietbookspace.com/weather-simple-weather-ios-app/
Next up: Part 3 – Core Architecture & MVVM Implementation for Simple Weather
Views: 0