From Structure to Architecture: Implementing MVVM in Simple Weather
In Part 2, we set up the project structure for Simple Weather. Now it’s time to implement the Core Architecture that will power our weather app. The MVVM (Model-View-ViewModel) pattern is the backbone of our Simple Weather architecture, providing clean separation of concerns and making our code testable, maintainable, and scalable.
Why MVVM for Simple Weather?
The Architecture Decision
When building Simple Weather, I chose MVVM over other patterns for several compelling reasons:
- SwiftUI Compatibility: MVVM works seamlessly with SwiftUI’s declarative nature and reactive programming model
- Testability: Clear separation between UI logic and business logic makes unit testing straightforward
- Maintainability: Each layer has a single responsibility, making the Simple Weather codebase easier to understand and modify
- Scalability: New features can be added without affecting existing code, perfect for a growing Simple Weather app
MVVM vs Other Patterns
While MVC and MVP are valid options, MVVM provides the best balance for Simple Weather:
- MVC: Too tightly coupled for modern SwiftUI apps
- MVP: Good but requires more boilerplate code
- MVVM: Perfect fit for SwiftUI’s reactive nature and our Simple Weather requirements
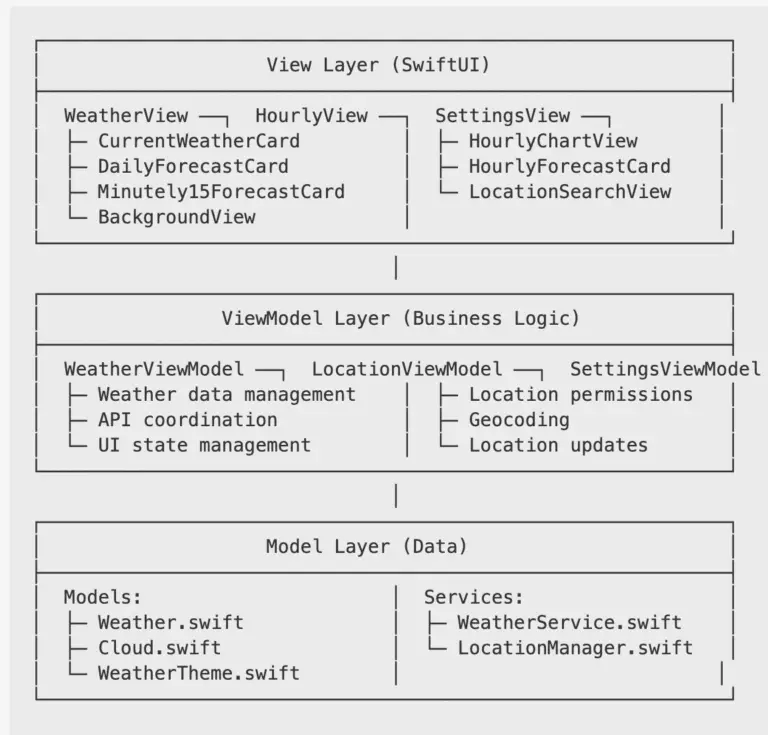
Core Architecture Overview
The MVVM Layers in Simple Weather
Our Simple Weather Core Architecture consists of three main layers:
Implementing the Core Architecture
1. Model Layer: Data Structures
The Model layer in Simple Weather defines our data structures and business entities:
					// MARK: - Weather Model
struct Weather: Codable, Identifiable {
    let id = UUID()
    let temperature: Double
    let feelsLike: Double
    let humidity: Int
    let windSpeed: Double
    let windDirection: String
    let condition: WeatherCondition
    let location: Location
    let timestamp: Date

    // Computed properties for UI
    var temperatureString: String {
        return "\(Int(temperature))°"
    }

    var conditionDescription: String {
        return condition.description
    }
}

// MARK: - Weather Condition Enum
enum WeatherCondition: String, Codable, CaseIterable {
    case sunny, cloudy, rainy, snowy, stormy

    var description: String {
        switch self {
        case .sunny: return "Sunny"
        case .cloudy: return "Cloudy"
        case .rainy: return "Rainy"
        case .snowy: return "Snowy"
        case .stormy: return "Stormy"
        }
    }

    var iconName: String {
        return self.rawValue
    }
}

// MARK: - Location Model
struct Location: Codable, Identifiable {
    let id = UUID()
    let name: String
    let latitude: Double
    let longitude: Double
    let country: String
}
2. ViewModel Layer: Business Logic
The ViewModel layer in Simple Weather manages the business logic and UI state:
					// MARK: - Weather ViewModel
@MainActor
class WeatherViewModel: ObservableObject {
    // MARK: - Published Properties
    @Published var currentWeather: Weather?
    @Published var hourlyForecast: [Weather] = []
    @Published var dailyForecast: [Weather] = []
    @Published var isLoading = false
    @Published var errorMessage: String?

    // MARK: - Dependencies
    private let weatherService: WeatherService
    private let locationManager: LocationManager

    // MARK: - Initialization
    init(weatherService: WeatherService, locationManager: LocationManager) {
        self.weatherService = weatherService
        self.locationManager = locationManager
        setupLocationUpdates()
    }

    // MARK: - Public Methods
    func fetchWeather() async {
        isLoading = true
        errorMessage = nil

        do {
            let location = try await locationManager.getCurrentLocation()
            let weather = try await weatherService.fetchWeather(for: location)

            await MainActor.run {
                self.currentWeather = weather
                self.isLoading = false
            }
        } catch {
            await MainActor.run {
                self.errorMessage = error.localizedDescription
                self.isLoading = false
            }
        }
    }

    func fetchHourlyForecast() async {
        guard let location = currentWeather?.location else { return }

        do {
            let forecast = try await weatherService.fetchHourlyForecast(for: location)
            await MainActor.run {
                self.hourlyForecast = forecast
            }
        } catch {
            await MainActor.run {
                self.errorMessage = error.localizedDescription
            }
        }
    }

    // MARK: - Private Methods
    private func setupLocationUpdates() {
        locationManager.locationUpdatePublisher
            .sink { [weak self] location in
                Task {
                    await self?.fetchWeather()
                }
            }
            .store(in: &cancellables)
    }
}
3. View Layer: SwiftUI Components
The View layer in Simple Weather focuses purely on UI presentation:
					// MARK: - Main Weather View
struct WeatherView: View {
    @StateObject private var viewModel: WeatherViewModel
    @EnvironmentObject var locationManager: LocationManager

    init(weatherService: WeatherService) {
        self._viewModel = StateObject(wrappedValue: WeatherViewModel(
            weatherService: weatherService,
            locationManager: locationManager
        ))
    }

    var body: some View {
        ZStack {
            // Background
            BackgroundView(weather: viewModel.currentWeather)

            // Content
            VStack(spacing: 20) {
                if viewModel.isLoading {
                    LoadingView()
                } else if let error = viewModel.errorMessage {
                    ErrorView(message: error) {
                        Task {
                            await viewModel.fetchWeather()
                        }
                    }
                } else if let weather = viewModel.currentWeather {
                    CurrentWeatherCard(weather: weather)
                    HourlyForecastCard(forecast: viewModel.hourlyForecast)
                    DailyForecastCard(forecast: viewModel.dailyForecast)
                }
            }
            .padding()
        }
        .task {
            await viewModel.fetchWeather()
        }
        .refreshable {
            await viewModel.fetchWeather()
        }
    }
}

// MARK: - Current Weather Card Component
struct CurrentWeatherCard: View {
    let weather: Weather

    var body: some View {
        VStack(spacing: 16) {
            // Temperature
            Text(weather.temperatureString)
                .font(.system(size: 72, weight: .thin))
                .foregroundColor(.primary)

            // Condition
            HStack {
                Image(systemName: weather.condition.iconName)
                    .font(.title2)
                Text(weather.conditionDescription)
                    .font(.title3)
            }
            .foregroundColor(.secondary)

            // Additional Details
            WeatherDetailsView(weather: weather)
        }
        .padding()
        .background(.ultraThinMaterial)
        .cornerRadius(16)
    }
}
Data Flow in Simple Weather
The MVVM Data Flow Pattern
Our Simple Weather Core Architecture follows this data flow:
1. User Action → View
2. View → ViewModel (via @Published properties)
3. ViewModel → Service (API calls)
4. Service → Model (data transformation)
5. Model → ViewModel (state update)
6. ViewModel → View (UI update via @Published)
Example: Fetching Weather Data
					// 1. User pulls to refresh → WeatherView
.refreshable {
    await viewModel.fetchWeather()
}

// 2. ViewModel processes the request
func fetchWeather() async {
    isLoading = true // Updates UI immediately

    do {
        let location = try await locationManager.getCurrentLocation()
        let weather = try await weatherService.fetchWeather(for: location)

        await MainActor.run {
            self.currentWeather = weather // Updates UI
            self.isLoading = false
        }
    } catch {
        await MainActor.run {
            self.errorMessage = error.localizedDescription
            self.isLoading = false
        }
    }
}
Testing the Core Architecture
Unit Testing ViewModels
The MVVM pattern makes testing straightforward in Simple Weather:
					// MARK: - Weather ViewModel Tests
class WeatherViewModelTests: XCTestCase {
    var viewModel: WeatherViewModel!
    var mockWeatherService: MockWeatherService!
    var mockLocationManager: MockLocationManager!

    override func setUp() {
        super.setUp()
        mockWeatherService = MockWeatherService()
        mockLocationManager = MockLocationManager()
        viewModel = WeatherViewModel(
            weatherService: mockWeatherService,
            locationManager: mockLocationManager
        )
    }

    func testFetchWeatherSuccess() async {
        // Given
        let expectedWeather = Weather.mockData()
        mockWeatherService.mockWeather = expectedWeather

        // When
        await viewModel.fetchWeather()

        // Then
        XCTAssertEqual(viewModel.currentWeather?.temperature, expectedWeather.temperature)
        XCTAssertFalse(viewModel.isLoading)
        XCTAssertNil(viewModel.errorMessage)
    }

    func testFetchWeatherFailure() async {
        // Given
        mockWeatherService.shouldFail = true

        // When
        await viewModel.fetchWeather()

        // Then
        XCTAssertNil(viewModel.currentWeather)
        XCTAssertFalse(viewModel.isLoading)
        XCTAssertNotNil(viewModel.errorMessage)
    }
}
UI Testing Views
					// MARK: - Weather View UI Tests
class WeatherViewUITests: XCTestCase {
    var app: XCUIApplication!

    override func setUp() {
        super.setUp()
        app = XCUIApplication()
        app.launch()
    }

    func testWeatherViewDisplaysCorrectly() {
        // Verify main elements are present
        XCTAssertTrue(app.staticTexts["Current Weather"].exists)
        XCTAssertTrue(app.images["weather-icon"].exists)
        XCTAssertTrue(app.staticTexts["temperature"].exists)
    }

    func testRefreshWeather() {
        // Pull to refresh
        let weatherView = app.scrollViews.firstMatch
        weatherView.swipeDown()

        // Verify loading state
        XCTAssertTrue(app.activityIndicators.firstMatch.exists)
    }
}
Dependency Injection Setup
Service Container
For Simple Weather, I implemented a simple dependency injection system:
					// MARK: - Service Container
class ServiceContainer {
    static let shared = ServiceContainer()

    // Services
    lazy var weatherService: WeatherService = {
        return WeatherService(apiKey: Configuration.weatherAPIKey)
    }()

    lazy var locationManager: LocationManager = {
        return LocationManager()
    }()

    // ViewModels
    func makeWeatherViewModel() -> WeatherViewModel {
        return WeatherViewModel(
            weatherService: weatherService,
            locationManager: locationManager
        )
    }

    func makeLocationViewModel() -> LocationViewModel {
        return LocationViewModel(locationManager: locationManager)
    }
}

// MARK: - App Entry Point with DI
@main
struct SimpleWeatherApp: App {
    var body: some Scene {
        WindowGroup {
            WeatherView(weatherService: ServiceContainer.shared.weatherService)
                .environmentObject(ServiceContainer.shared.locationManager)
        }
    }
}
Performance Considerations
Memory Management
Our Simple Weather Core Architecture includes several performance optimizations:
					// MARK: - Memory-Efficient ViewModels
class WeatherViewModel: ObservableObject {
    // Use weak references to avoid retain cycles
    private weak var locationManager: LocationManager?

    // Cancel subscriptions when deallocated
    private var cancellables = Set<AnyCancellable>()

    deinit {
        cancellables.removeAll()
    }
}

// MARK: - Lazy Loading for Large Data
class WeatherViewModel: ObservableObject {
    @Published private(set) var hourlyForecast: [Weather] = []

    func loadHourlyForecast() async {
        // Load data in chunks to avoid memory issues
        let chunkSize = 24
        for i in stride(from: 0, to: 168, by: chunkSize) {
            let chunk = Array(forecastData[i..<min(i + chunkSize, forecastData.count)])
            await MainActor.run {
                self.hourlyForecast.append(contentsOf: chunk)
            }
        }
    }
}
Next Steps in Simple Weather Development
With the Core Architecture and MVVM implementation in place, we’re ready to move forward with:
- Part 4: Building the Weather Data Models
- Part 5: Implementing the Weather API Service
- Part 6: Creating the Main Weather View
Key Takeaways from Core Architecture & MVVM Implementation
- Clear Separation: MVVM provides clear boundaries between UI, business logic, and data
- Testability: Each layer can be tested independently, improving code quality
- Maintainability: Changes in one layer don’t affect others
- Scalability: New features can be added without breaking existing functionality
- SwiftUI Integration: MVVM works perfectly with SwiftUI’s reactive programming model
Tools and Best Practices
Recommended Tools for MVVM Development
- Xcode: Built-in testing and debugging tools
- SwiftLint: Code style enforcement for consistent MVVM patterns
- Instruments: Performance profiling for Core Architecture optimization
- Git: Version control for tracking architectural changes
MVVM Best Practices for Simple Weather
- Single Responsibility: Each ViewModel handles one specific feature
- Dependency Injection: Services are injected, not created within ViewModels
- Error Handling: Centralized error handling in ViewModels
- State Management: Use @Published properties for reactive UI updates
- Testing: Write unit tests for all ViewModel logic
Get Involved in Simple Weather Development
The Core Architecture and MVVM implementation provide a solid foundation for Simple Weather. In the next part, we’ll dive into building the weather data models that will power our app.
Have questions about MVVM implementation or suggestions for improving the Core Architecture? Share your thoughts in the comments below!
Weather – Simple Weather iOS App: https://apps.apple.com/us/app/weather-simple-weather/id6747141875
Weather – Simple Weather support page and privacy page, please visit here: https://tools.regalrealm.com/ios-support/
Weather App Home Page: https://quietbookspace.com/weather-simple-weather-ios-app/
Next up: Part 4 – Building the Weather Data Models for Simple Weather
Views: 1